
")
How To Fix Easily Microphone Not Working On Windows will be described in this article. An audio system’s microphone is essential, especially if your job involves recording audio. Any activity that involves a microphone is necessary, such as voice-over videos, video calls, gaming, and more. While many people utilize the laptop’s built-in microphone, some people carry backup microphone-equipped headphones or earbuds. It can be inconvenient to spend hours troubleshooting a microphone problem. These problems could arise for a number of reasons, such as insufficient microphone access granted to the computer, broken microphone drivers, outdated or corrupted drivers, incorrect microphone connection, etc. If you need to know why your Windows 11 microphone stopped working, this article will assist you in fixing it.
How To Fix Easily Microphone Not Working On Windows
In this article, you can know about How To Fix Easily Microphone Not Working On Windows here are the details below;
The steps listed below will help you resolve the issue if your microphone is not picking up sounds or if you are having other similar problems.
Check Microphone cable
Examine the microphone cable prior to making any changes to the system configuration. Only use an external microphone on a laptop; do not use the internal one. Check to make sure the cable is plugged into your computer appropriately. Connect it to your PC appropriately if it isn’t already. Re-plug the microphone after disconnecting it if it still doesn’t work. Examine the cable for damage. Normal wear and tear on cables may be the cause of this problem. A detachable cable is often included with microphones, which you can replace if it breaks. You’ll have to get a new microphone if not.
Allow PC to Access Your Microphone
The problem can be coming from your Windows PC if you haven’t enabled microphone access. Take the actions listed below to accomplish this.
- Press Windows + I to open the Settings menu.
- Select Privacy & Settings from the left pane.
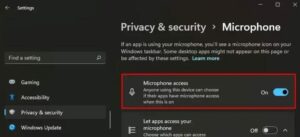
- Select the microphone icon on the right.
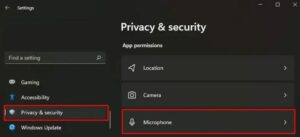
- Turn on the microphone access if it’s not already.
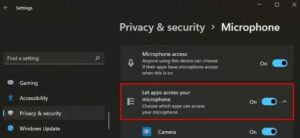
- Turn on the feature After allowing apps to utilize your microphone, turn on all of the apps that do so.
Make changes to sound properties dialog
The discourse regarding the sound parameters can also be altered. Here are the steps to accomplish it.
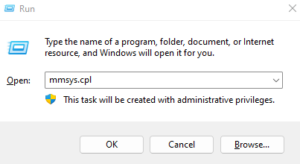
- To open mmsys.cpl, use Windows + R, type it, and hit Enter.
- Select the tab for recording.
- Click Properties after performing a right-click on the microphone.
- After that, select the Advanced tab and deselect the option to give preference to applications in exclusive mode.
- Click OK after selecting Apply to save your changes.
Run recording Audio Troubleshooter
Windows has a troubleshooter for every piece of hardware and software. One possible solution to this problem could be to use the recording audio troubleshooter. By doing the actions listed below, you can do this.
1-Click the taskbar search button and type settings to open the Settings window.
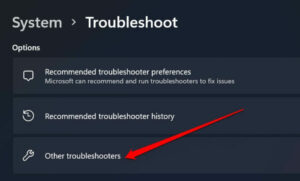
- In the left pane, click and the System tab and select the Troubleshoot option.
- Select “Additional troubleshooters.”
4 – Look for Recording Audio in this location, then select Run next to it.
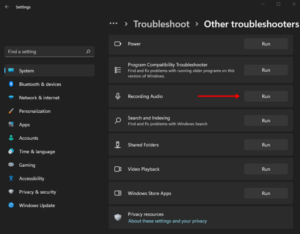
5 – Select the problematic device and press the Next button.
- The troubleshooter will now carry out another scan and resolve the problem. Click Apply this repair after that.
Restart Windows audio service
Try restarting the Windows Audio Service to see if the problem persists. Take the actions listed below to accomplish this.
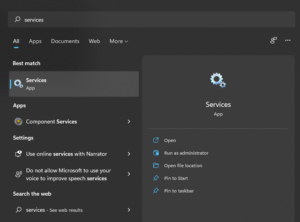
1 – To start Services, press the Windows key and type services into the search field. Then, click the relevant search result.
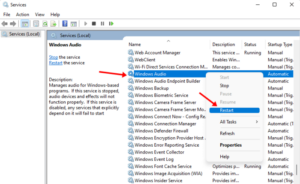
- Go here and look for the Windows Audio service. After doing a right-click, select Restart.
Update Microphone Drivers
Older microphone drivers are probably the root of the problem. You can upgrade the microphone driver to resolve the problem. The instructions listed below will help you achieve this. Also check How To Fix My Instagram Story Stuck
- Right click the Start icon on taskbar to open Device Manager.
- Double-click the audio inputs and outputs to expand them.
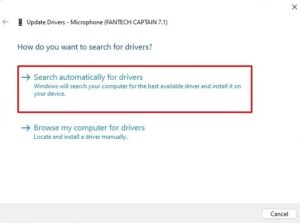
- Select Update driver by doing a right-click on your microphone.
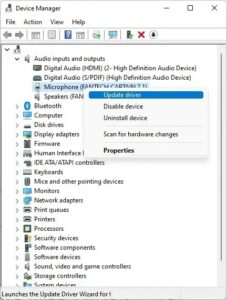
- Click Search automatically for drivers to start looking up driver updates online.
Reinstall microphone Drivers
Try reinstalling the drivers if updating them does not solve the issue. Take the actions listed below to accomplish this.
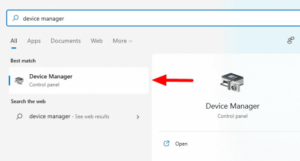
1.To search for Device Manager on your computer, hit the Windows key. Then, choose the first option that appears.
- Double-click on the audio inputs & the outputs to expand them.
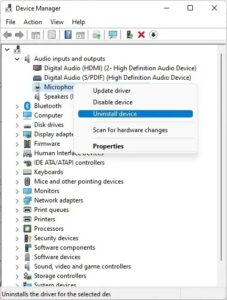
- Select Uninstall device from the menu by right-clicking on your microphone driver.
4 – To confirm uninstalling the device, select the Uninstall option on the confirmation box.
5 – Restart your computer to have the microphone automatically reinstalled after it’s finished. Also check How To Fix Xbox One Installation Stopped
Conclusion:
By following the above instructions, you should be able to resolve the Windows 11 microphone not working issue. If the aforementioned changes still don’t work, try utilizing the microphone with a different PC. If the microphone functions on a different PC, there might be a problem with the motherboard or the audio card. In this case, you have to take your PC to a specialist for repair.