

How To Fix Google Chrome Won’t Install In Windows will be described in this article. Are you having difficulty installing Google Chrome on your Windows operating system? Don’t worry – it’s a common issue! However, with the right solutions and quick fixes, this problem can be resolved easily. The most likely causes of installation issues are conflicting software or corrupted files.
How To Fix Google Chrome Won’t Install In Windows
In this article, you can know about How To Fix Google Chrome Won’t Install In Windows here are the details below;
In this guide, we have outlined some efficient ways to get Google Chrome up and running again in a matter of minutes. So, let’s get started.
On what errors, does Chrome fail to install in Windows?
Google Chrome won’t install issue normally occurs on some error codes like 4, 7, 12, 13, 31, 35, 57, 102, 103, 1603, 0x643, or 0x80070070. These error messages suggest that something went wrong with either the installation file or there has been some internal corruption in Windows. This could also happen when the internet connectivity is slow or not connecting.
In addition to this, there’s also a possibility that the previous Chrome installation files are blocking the new Chrome installation on Windows. This usually happens when you are installing Google Chrome by using its web installer. You may solve this issue by simply downloading its offline installer and running the same as an administrator on Windows.
Sometimes, Chrome fails to install simply because your system lacks the minimum requirements set out by Google to install Chrome on Windows. If that’s the case, you can’t do anything except for replacing your system or switching to a different browser like Mozilla, Edge, Brave, or Vivaldi.
Fix Google Chrome Won’t install on Windows
If Google Chrome is failing to install on your computer because of the above reasons, we suggest attempting the below fixes and having this problem resolved. Though you may apply these solutions in any order, we recommend proceeding with the same order in which they were put.
1. Enable Installing Software from Third-party Sites
Windows 11/10 normally allows installing executable files from third-party sources or websites. However, if you have prohibited installing new applications from external sources other than Microsoft Store, this may prevent installing Google Chrome on your Windows PC.
If you do remember adding such restrictions on your computer, you need to re-configure this setting. Here’s how to perform this task –
Windows 11:
- Press Windows + I to launch Settings.
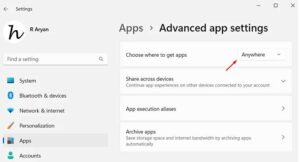
- Go to Apps > Advanced app settings.
- Use the drop-down menu following to Choose where to get apps & select Anywhere.
- Choose where to get Apps & select Anywhere on Windows 11
Restart your Windows 11 PC next and check if you can establish Google Chrome on your device normally now.
Windows 10:
- Press Windows + X, and choose Apps & features from the Power Menu.
- Head over to the right pane and locate Choose where to get apps.
- Use the drop-down available next to this section, and select Anywhere.
- Choose where to get apps & select Anywhere
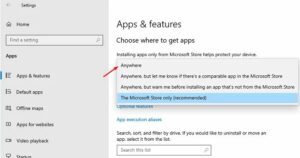
Or, you may select “Anywhere, but let me comprehend if there’s a similar app in the Microsoft Store”. This way, Windows will let you know of any other applications available inside Windows Store. Also check HTTP Error 422
Restart your PC and when it does come back online, sign in to your Microsoft account or Local account. Now, check if you can install Chrome without any issues.
2. Run Chrome executable file as an administrator
If you are not signed in as an administrator, you won’t be able to install Google Chrome on your Windows PC. So, sign in as an administrator on your computer and check if you can install Chrome normally now.
Running Google Chrome’s setup file as an administrator is quite easy. All you require is to right-click on its executable file & choose the Run as administrator option. The UAC window will prompt next asking if you really want to install the selected file. Well, click Yes and follow the on-screen instructions to complete installing Chrome on Windows.
3. Enable the BITS Service
The Background Intelligent Transfer Service must be operating in the background before you install any new program on your Windows PC. If this service is not running, the installation will not complete or rather fail on some error code.
- To check if this service is enabled and running, use these steps –
- Press Windows + R to launch the Run conference.
- Type “services.msc” without quotes and hit OK.
- When the services window opens up, scroll down to the Background Intelligent Transfer Service.
- Right-click on this assistance & choose the Properties option.
- Check what’s written under the Startup type. If this is displaying Manual, change it to Automatic using the drop-down menu. However, before you do that, make sure to click the Stop button first. Also check How To Fix Roblox Error Code 524
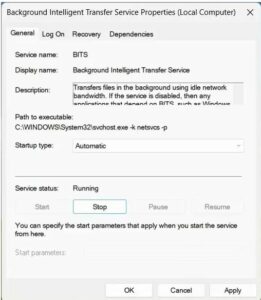
- After you have changed the Startup type to Automatic, click the Start button.
- Wait for this service to start and when it is done, click Apply and then OK.
- Close the Services window and restart your PC.
- From the next logon, check if you can install Google Chrome into your computer normally now.
4. Remove the Google entries inside the registry
When you uninstall Google Chrome from Windows, a prompt appears suggesting you restart your computer. Users should always reboot their devices after a recent uninstallation of a game or application on Windows. This way, the residual or leftover files delete as well.
However, if you didn’t restart your device after an app uninstallation, the leftover files will remain on your PC unless deleted manually. Well, you may get rid of these files by deleting the Chrome’e registry entries. Here’s how to perform this task –
Tip: Making unwanted changes inside the registry may corrupt your entire operating system. So, make sure to create a backup of all registry entries and then proceed ahead with the below steps.
- Press Windows + R to throw the Run dialog.
- Type Regedit on it and hit OK.
When the UAC window prompts, smashed Yes to authorize opening the registry as an administrator.
- On the registry editor, navigate to the below path –
HKEY_CURRENT_USER\SOFTWARE\Google
- Right-click on the Google folder and choose the Delete option.
- A confirmation window will occur next, hit Yes to confirm deleting this Google folder.
- After you have successfully deleted this folder, make sure to delete the Google folder from the below locations as well –
HKEY_LOCAL_MACHINE\SOFTWARE\Google
- Browse to the below path next and check if there’s a Google folder inside the WOW6432Node. If there is one folder named “Google”, right-click on it and choose to delete this folder as well.
HKEY_LOCAL_MACHINE\SOFTWARE\WOW6432Node\Google
- Next, navigate to the below path inside the registry –
HKEY_CURRENT_USER\SOFTWARE\Google\Update\ClientState
- Head over to the right pane and look for a profile named – “4DC8B4CA-1BDA-483e-B5FA-D3C12E15B62D”.
- If you do find this folder on the right pane, right-click on it, and select the Delete option.
- Again, if a confirmation window appears, hit the Yes button.
After you have deleted the Google folder from the above instances, close the registry, and restart your computer. Since you have deleted the previous versions of Google Chrome, check if you can install Chrome using its web installer.
5. Reinstall Google Chrome using its standalone installer
If none of the above workarounds help to resolve the Google Chrome won’t install issue, you should download its offline installer and install Chrome on Windows using that. Here’s how to proceed with this task – Also check Google Chrome Won’t Install In Windows
Note: If you’ve already installed Google Chrome on your computer and the same is not opening, make sure to uninstall that before. You may do this either via Control Panel or Windows Settings.
- First of all, visit the official site of Chrome’s Standalone Installer page.
- Scroll down & click on the Download button.
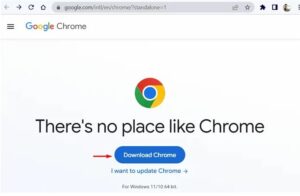
- Choose a folder where you would like to save this offline installer.
- After you download it, double-click on the executable file to begin Chrome installation on your PC.
I hope this resolves the Chrome won’t install issue on your computer. Let’s know in the comment section exactly which solution works in your case.