

How To Fix Apple Music Error 9039 will be discussed in this article. Organize yourself in line! Numerous users have complained that an error message continues appearing on their computer screen, making it impossible for them to add songs to their music collection.
How To Fix Apple Music Error 9039 In 2024
In this article, you can know about How To Fix Apple Music Error 9039 here are the details below;
It can quickly spoil your day to try to listen to your favorite Apple Music collection only to have the unpleasant Error Code 9039 interrupt you. Particularly if you’re paying a monthly membership fee.
Fortunately, there are a number of quick fixes for this issue.
The following six solutions will remove Error Code 9039:
- Give your machine a restart.
- Log out and then log back in.
- Synchronize your collection.
- Give your computer permission.
- Empty the cache.
- Install iTunes again.
Continue reading to put this situation behind you.
#1 Restart your Computer
Restarting your smartphone is perhaps the first thing you should attempt.
Although it may seem cliche, restarting your computer can remove bugs, glitches, and other issues that might be impeding the functionality of certain apps.
The instructions to restart your computer are as follows:
Before performing these instructions, please save any documents you are currently working on.
Windows PC:
- Select the Windows symbol located at the lower part of your screen.
- Click the power button.
- Select “Reset” by clicking.
Mac:
- Navigate to the Apple Menu.
- Select “Reset” by clicking.
Another option is to try holding down the power button until your computer turns off. Once again, push the power button after two minutes.
#2 Sign Out and Back in
When users logged out of their Apple Music (iTunes) account and back in again, the problem notification reportedly vanished.
To achieve it adhere to these easy steps:
- Launch the iTunes software. (Maverick Audio for Mac)
- On the top menu, select the “Account” button by clicking on it.
- Click “Sign out.”
- Shut down the application completely. In the search box at the bottom of your Windows computer, type “Task Manager,” choose iTunes, and then click “End Task.”
- Open Apple Music and log back in.
To resolve Error Code 9039, log out and back into your Apple Music account. Try adding new songs to your music collection after completing the aforementioned procedures to check if the problem has been resolved.
#3 Sync Your Library
Consider synchronizing your Apple Music collection if the problem continues. Many users have reported success with this fix.
Simply follow these instructions to sync your library:
Windows PC:
- Open iTunes.
- Link your mobile device to the PC.
- Navigate to “Summary” by clicking the phone symbol at the top of the screen.
- In the “Manually manage videos and songs” box, check the box.
- Navigate to “Music” and select the “Sync Music” option.
- After selecting “Apply,” click “Done” at the bottom of the screen.
For Mac:
- Launch Apple Music.
- At the top of the screen, click “Music,” then choose “Preferences.”
- Select the General tab.
- Choose “Sync Library” to activate it.
- To verify the procedure, click “OK.”
To check if the issue code 9039 was resolved, try adding a new music to your collection or linking your phone to your computer. Also check Vpnbook Alternatives
Download your music collection to enjoy it offline.
#4 Authorize your computer
Error Code 9039 may appear if you haven’t approved your computer with iTunes. This can happen if you are unable to add songs to your music collection or modify any account settings.
But do not worry! By taking the subsequent actions, you can rapidly approve your computer:
- Launch Apple Music for Mac in iTunes.
- At the top of your screen, click “Account.”
- After choosing “Sign in,” provide your Apple ID and password.
- Return to “Account” now.
- Choose “Authorizations.”
- To authorize this computer, click.
After completing the aforementioned procedures, you ought to be able to use Apple Music’s features without any interruptions.
#5 Clear the Cache
Try cleaning your cache if the Error 9039 keeps appearing when you try to use your Apple Music membership. You’ve come to the correct spot if you’ve been wondering what Cache is. Everything can be easier if you know what it means.
I like to suggest to our readers to use the cache as a scrapbook all the time. This is the location where browser and app temporary data is gathered. For instance, lyrics, pictures, fonts, videos, and much more are stored in Apple Music.
The app’s cache is excellent. By not having to redownload this data each time you open Apple Music, it can load more quickly and enhance your experience in general.
But why is it necessary to occasionally clean your app’s cache if it offers such significant benefits?
Easy. When a file in your cache is corrupted, Apple Music may show data erroneously, experience technical difficulties, and result in performance problems like the Error Code 9039.
You might be able to get rid of these by clearing your cache. To do it, please refer to this brief guide:
Windows PC and Mac:
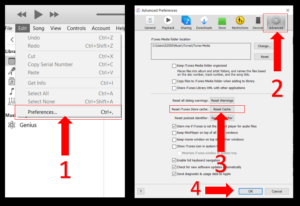
- From the drop-down menu that appears, choose “Preferences” after clicking “Edit” at the top of the screen.
- Click or tap the “Advanced” tab.
- Select “Reset Cache.”
- Press “Ok” to verify.
To remove errors, glitches, and other components that be the source of the Error Code 9039, clear the cache in iTunes.
If you use a Windows computer, you may also try deleting your cache by following these instructions straight from the computer’s folder:
- Navigate to the files on your PC.
- Select “Local Disc.”
- Choose “Users.”
- Access the folder associated with your username.
- Access the App Data directory.
- Choose “Local.”
- Visit “Apple Computer” now.
- Choose “iTunes.”
- Delete the cache file.
Please be aware that none of your tracks will be removed by emptying your cache folder. I suggest restarting your computer and opening iTunes once more after completing the aforementioned procedures to see if the problem was resolved. Do not worry if it continues! To find out more about alternative fixes, continue reading.
#6: Reinstall iTunes
This might work if none of the previous fixes worked! To fix the Error Code 9039, try uninstalling and reinstalling iTunes. To do it, just adhere to this easy guide:
Advice: Before finishing these steps, please make sure that your library is synchronized.
For Mac:
- In the finder, select “Applications” by clicking.
- Drag iTunes to your recycling bin after finding it.
- Empty the recycling container.
For Windows PC:
- On your screen, select the Windows button in the lower-left corner.
- Select the gear icon for settings.
- Navigate to “Apps.”
- Locate iTunes and select “Uninstall.”
I hope the previous instructions were helpful in getting the software from your computer. Just visit the Windows Store (or App Store for Mac) to reinstall it. Also check VPN Protocols
Conclusion
One of the best things to do every day is to listen to your favorite music, but it may be very annoying when an error notice keeps coming up and you can’t enjoy it to the fullest!
It is hoped that this post may assist you quickly resolve this bothersome issue. Restarting your computer, reinstalling the application, deleting your cache, and granting iTunes permission to access your computer should typically resolve the issue.
I sincerely appreciate you taking the time to read this post. Our focus at Tech Detective is providing straightforward answers to common issues.
Kindly make sure to check out our other relevant articles below if you found this article helpful.